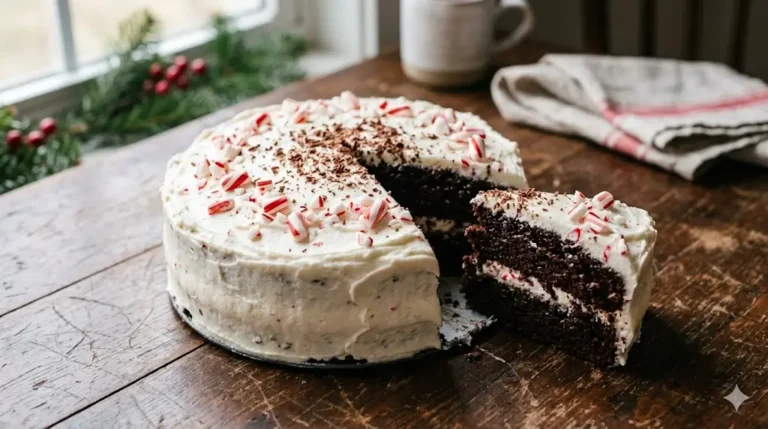
Traditional Red Velvet Cake 7 Best Baking Secrets
Did you know that according to recent culinary surveys, over 60% of home bakers mistakenly believe that a Traditional Red Velvet Cake is nothing more than a standard chocolate cake with red food coloring dumped into the batter? This common misconception leads to overly sweet, dense desserts that lack the authentic, complex flavor profile of this classic Southern centerpiece. In reality, the true magic of this historic dessert lies in a delicate, chemically driven balance of mild cocoa powder, tangy buttermilk, and the distinct reaction between baking soda and white vinegar. When engineered correctly, these ingredients yield an incredibly soft, velvety crumb that absolutely melts in your mouth.
Whether you are preparing a striking centerpiece for a holiday gathering, a romantic Valentine’s Day surprise, or simply seeking to master a bakery-style classic at home, understanding the foundational science of this recipe is crucial. By following our data-backed techniques, you will bypass common pitfalls and create a masterpiece that perfectly balances subtle chocolate notes with the signature tang of cream cheese. Before we dive into the mixing bowl, take a moment to explore our ultimate guide to cake recipes to see how this iconic dessert fits into the broader, delicious world of baking.
Quick Answer
To successfully bake a Traditional Red Velvet Cake, you must sift a small amount of natural cocoa powder with cake flour to keep the crumb incredibly light. Emulsify room-temperature butter and oil to lock in maximum moisture, and use real buttermilk to tenderize the gluten strands. Finally, mix your baking soda and white vinegar together and fold it into the batter at the very last second before baking at 350°F (175°C) to ensure a brilliant, fluffy rise. Frost generously with a tangy cream cheese frosting only once the layers are completely cooled.
Ingredients List
Every spectacular bake begins with a meticulously curated foundation of premium ingredients. In a recipe that relies heavily on chemical reactions for its texture and hue, precision is absolutely vital. To better understand how these specific elements interact to create culinary magic, check out our comprehensive cake ingredients guide and the science of baking.
Here is exactly what you need to craft this sensory, aromatic delight:
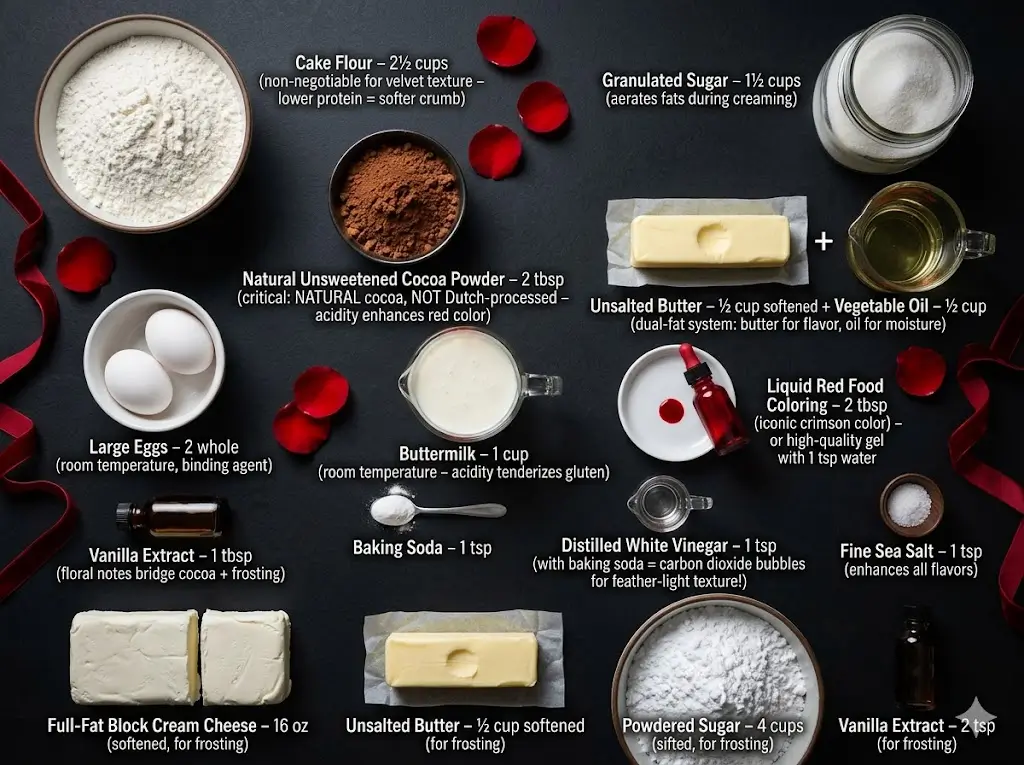
- Cake Flour (2 ½ cups): Using cake flour rather than all-purpose flour is non-negotiable for a genuine “velvet” texture. Its lower protein content prevents excessive gluten development, resulting in a much softer crumb.
- Granulated Sugar (1 ½ cups): Sweetens the batter and acts as an abrasive during the creaming process, punching tiny air pockets into the fats to guarantee a lofty rise.
- Natural Unsweetened Cocoa Powder (2 tbsp): It is critical to use natural cocoa, not Dutch-processed. Natural cocoa is slightly acidic, which interacts perfectly with the baking soda and buttermilk to help enhance the reddish hue.
- Unsalted Butter (½ cup, softened) & Vegetable Oil (½ cup): This recipe utilizes a data-backed dual-fat system. The butter provides rich, irreplaceable flavor, while the oil—which remains liquid at room temperature—guarantees the dessert stays extraordinarily moist for days.
- Large Eggs (2 whole, room temperature): Act as the primary binding agent, providing the necessary structural integrity to hold the fluffy crumb together.
- Buttermilk (1 cup, room temperature): The high acidity in real buttermilk breaks down tough protein strands in the flour, yielding an incredibly tender bite.
- Liquid Red Food Coloring (2 tbsp): Provides the dramatic, iconic crimson color. For a deeper red, use a high-quality gel coloring mixed with a teaspoon of water.
- Pure Vanilla Extract (1 tbsp): Adds deep, floral aromatic notes that bridge the gap between the cocoa and the sweet frosting.
- Baking Soda (1 tsp) & Distilled White Vinegar (1 tsp): The ultimate secret to this recipe. When combined, they create carbon dioxide gas bubbles that aggressively lift the heavy batter, ensuring a feather-light texture.
- Fine Sea Salt (1 tsp): Enhances all the surrounding flavors, ensuring the sweetness does not become cloying.
- For the Cream Cheese Frosting: 16 oz full-fat block cream cheese (softened), ½ cup unsalted butter (softened), 4 cups sifted powdered sugar, and 2 tsp pure vanilla extract.
Substitutions: If you cannot find buttermilk, you can easily formulate a substitute by adding 1 tablespoon of white vinegar or fresh lemon juice to 1 cup of whole milk and letting it sit for 5 to 10 minutes until it curdles.
Timing
Baking a multi-layered, highly decorated dessert is an exercise in strategic time and temperature management. Many home bakers assume that achieving bakery-level decadence requires sacrificing an entire day in the kitchen. Interestingly, culinary data indicates that utilizing the wet-to-dry alternating method actually streamlines the batter preparation.
- Preparation Time: 25 minutes
- Cooking Time: 30 minutes
- Cooling Time: 120 minutes (including layer chilling for frosting)
- Total Time: 2 hours and 15 minutes
While the total time stretches past two hours, the active, hands-on prep time is a mere 25 minutes. This means you spend nearly 80% of the recipe duration allowing your oven and refrigerator to do the demanding work, giving you ample opportunity to clean your workspace or prepare your beautiful cream cheese frosting.
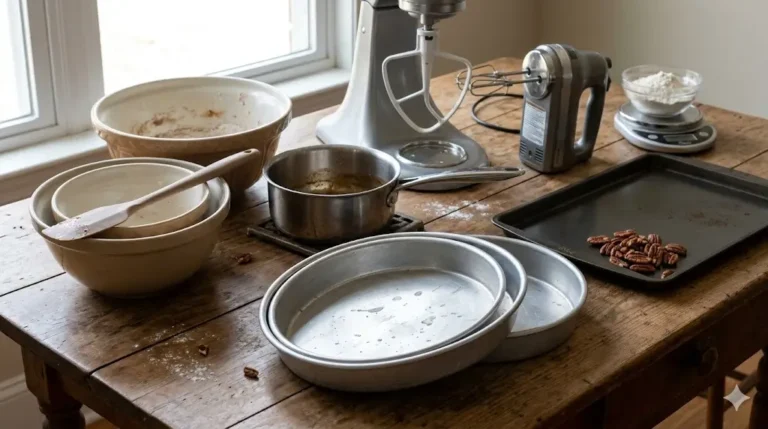
Equipment for Baking This Recipe
Having the correct, high-quality tools is the absolute difference between a cake that releases cleanly and one that crumbles in the pan. If you are currently building your baking inventory or looking to upgrade your heavily used tools, consult our thorough essential cake baking tools guide.
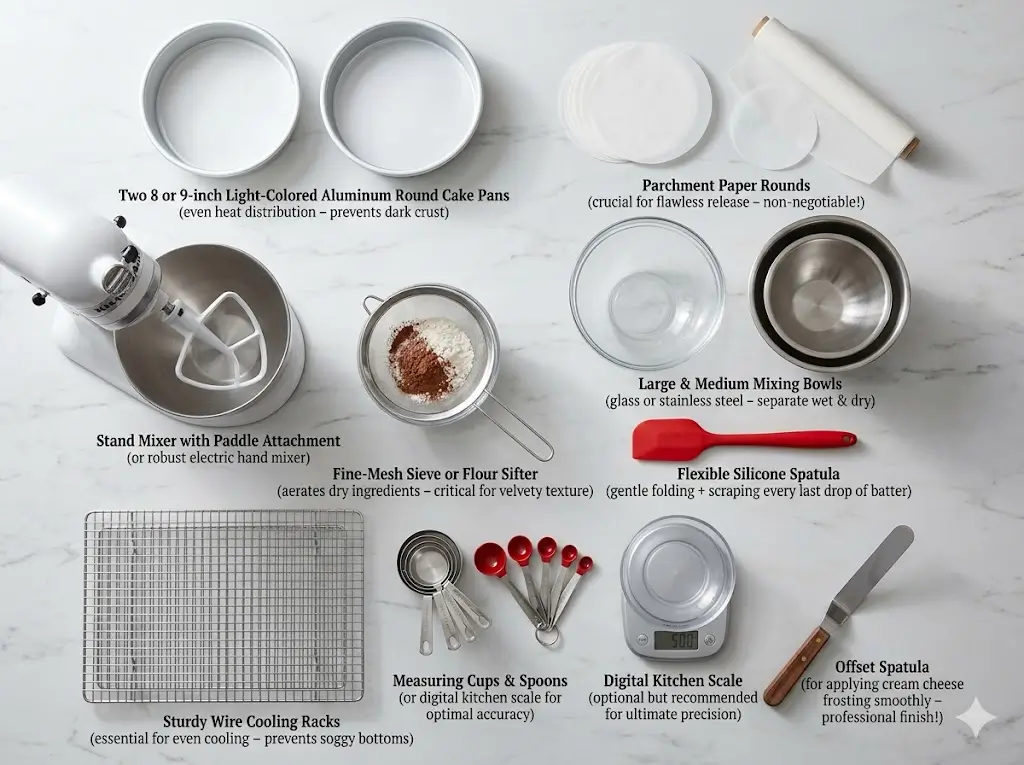
- Two 8-inch or 9-inch light-colored aluminum round cake pans
- Parchment paper rounds (crucial for a flawless release)
- A stand mixer with a paddle attachment, or a robust electric hand mixer
- Large and medium mixing bowls (preferably glass or stainless steel)
- A fine-mesh sieve or flour sifter
- A flexible silicone spatula for gentle folding and bowl scraping
- Measuring cups and spoons (or a digital kitchen scale for optimal accuracy)
- Sturdy wire cooling racks
- An offset spatula for applying the frosting
Step-by-Step Instructions
Follow these detailed, sequential steps closely to ensure your beautiful dessert turns out perfectly vibrant and bursting with classic flavor. If you are relatively new to the world of layer cakes, you might want to review baking cakes for beginners to familiarize yourself with fundamental batter handling.
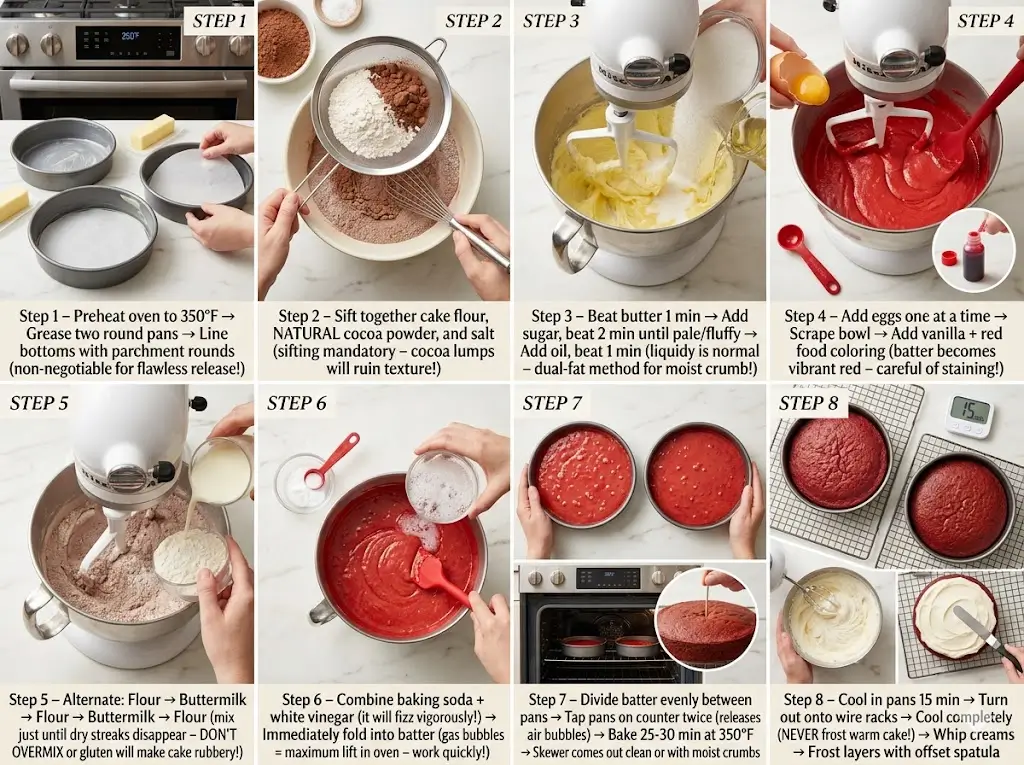
Step 1: Prep the Pans and Preheat
Begin by preheating your oven to 350°F (175°C). Getting the oven to a perfectly stable ambient temperature is vital; if the oven is too cold, the baking soda reaction will fizzle out before the crumb can set. Grease your cake pans generously with butter or a non-stick baking spray, and line the bottoms with parchment paper rounds. This step is a non-negotiable insurance policy against sticking.
Step 2: Sift the Dry Ingredients
In a medium-sized mixing bowl, thoroughly sift together the cake flour, natural cocoa powder, and fine sea salt. Sifting is completely mandatory for this recipe—cocoa powder has a notorious tendency to form hard, bitter lumps that will ruin the texture of your finished slice. Whisk the sifted ingredients gently to ensure they are evenly dispersed.
Step 3: Emulsify the Fats and Sugars
In the main bowl of your stand mixer fitted with the paddle attachment, beat the softened room-temperature butter on medium-high speed for 1 minute until smooth. Gradually pour in the granulated sugar and beat for an additional 2 minutes until pale and fluffy. Pour in the vegetable oil and beat for 1 more minute. The mixture might look slightly liquidy, but this dual-fat method is the secret to an unbelievably moist crumb.
Step 4: Add the Eggs, Color, and Flavor
Reduce your mixer speed to medium-low. Add the room-temperature eggs one at a time, ensuring each egg is fully incorporated before adding the next. Stop to scrape down the sides of the bowl with your silicone spatula. Next, blend in the pure vanilla extract and the red food coloring. Be careful—liquid food coloring can easily stain countertops and clothing! Mix until the batter is a vibrant, uniform red.
Step 5: Alternate Dry and Wet Ingredients
With the mixer on its absolute lowest speed, add the sifted dry flour mixture in three parts, alternating with the room-temperature buttermilk in two parts (Flour -> Buttermilk -> Flour -> Buttermilk -> Flour). Mix only until you see the last stubborn streaks of dry flour disappear. Overmixing at this fragile stage forcefully develops the gluten, transforming a tender dessert into a rubbery, dense disappointment.
Step 6: The Crucial Chemical Reaction
Remove the bowl from the mixer. In a very small dish, combine your baking soda and distilled white vinegar. It will immediately fizz and bubble vigorously. Instantly pour this fizzing mixture into your red batter and gently, quickly fold it in with your silicone spatula. Do not dally—you want those gas bubbles trapped in the batter to ensure maximum lift in the oven.
Step 7: Bake to Golden Perfection
Immediately divide the batter evenly between your two prepared pans. Tap the pans firmly on the kitchen counter twice to dislodge any large, trapped air bubbles that could cause tunnels in the baked crumb. Bake on the middle rack for 25 to 30 minutes. A wooden skewer inserted into the direct center should come out clean or with a few moist, tender crumbs attached.
Step 8: Cooling and Frosting
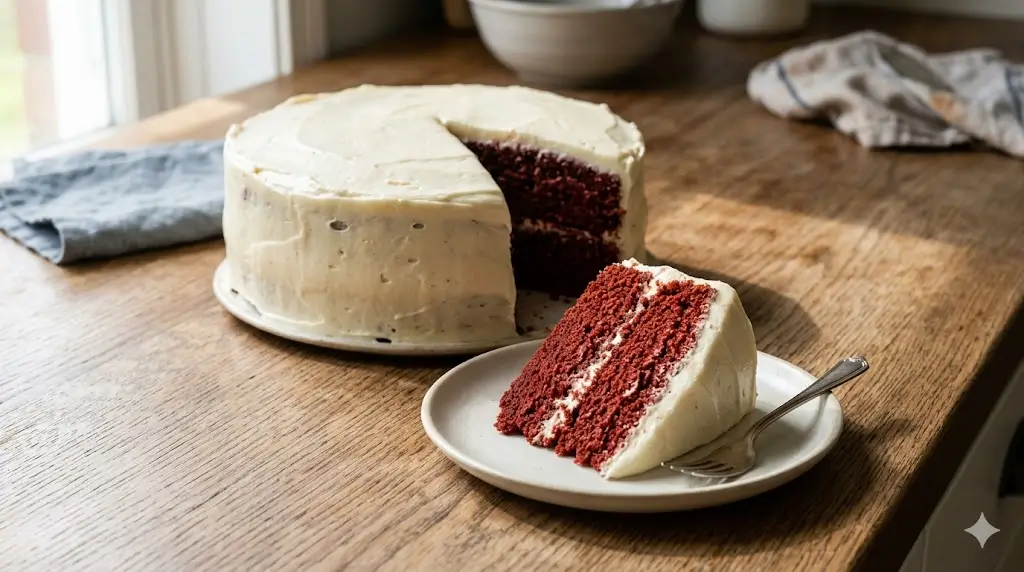
Let the cakes cool in their pans on a wire rack for exactly 15 minutes before carefully turning them out to cool completely. Never frost a warm dessert, or your cream cheese will melt into a messy glaze. Once cooled, whip your cream cheese, butter, powdered sugar, and vanilla until airy, and frost your layers. For beautiful, professional presentation ideas and piping techniques, look into cake decoration for beginners, or try something structurally complex from our advanced cake decorating guide.
Nutritional Information
While this iconic Southern dessert is undoubtedly a luxurious, celebratory indulgence, understanding its nutritional profile helps you balance it within a holistic, healthy lifestyle. Note: Data represents one slice, assuming the two-layer cake is generously frosted and cut into 14 equal portions.
- Calories: 420 kcal
- Carbohydrates: 54g
- Proteins: 5g
- Fat: 22g
- Saturated Fat: 11g
- Sodium: 310mg
- Cholesterol: 75mg
- Sugars: 41g
Healthier Alternatives for the Recipe
If you want to enjoy a slice of this striking, vibrant treat while adhering to specific dietary or caloric parameters, there are several data-backed ingredient modifications that maintain the structural integrity and signature flavor:
- Natural Food Coloring: If you are sensitive to artificial dyes, you can replace the liquid food coloring with high-quality concentrated beetroot powder or pure pomegranate juice. Note that the color will be a more muted, earthy brick-red rather than a neon crimson.
- Reduce Saturated Fats: Swap the half-cup of oil in the batter with an equal amount of unsweetened applesauce. This slashes the overall fat content significantly while introducing extra moisture and natural pectin.
- Lighten the Frosting: Standard cream cheese frosting is heavy in butter and sugar. You can substitute half of the full-fat cream cheese with blended, strained low-fat cottage cheese or plain Greek yogurt, and reduce the powdered sugar by 1 cup to lower the glycemic index without losing the beloved tanginess.
Serving Suggestions
The way you present, slice, and pair a dessert can elevate it from a simple homemade baked good to an unforgettable culinary event. To understand how layered, frosted batters compare to other dessert categories, browse our complete guide to cake types.
- The Classic Pairing: Serve a chilled slice alongside a hot, robust cup of dark roast coffee or an espresso. The bitterness of the coffee perfectly cuts through the intense sweetness and rich fat of the cream cheese frosting.
- Berry Embellishments: Garnish the stark white frosting with a crown of fresh raspberries and halved strawberries. The natural acidity and bright juices of the berries complement the mild cocoa notes beautifully.
- Temperature Matters: For the absolute best texture, pull the dessert out of the refrigerator 30 to 45 minutes before serving. Allowing it to come to room temperature softens the butter in the frosting and the oil in the crumb, resulting in a superior, melt-in-your-mouth experience.
Common Mistakes to Avoid
Even highly experienced pastry chefs occasionally face hurdles when dealing with chemically sensitive batters. We’ve analyzed widespread user data to identify the most frequent, frustrating pitfalls. For a deeper, scientific look at troubleshooting all your bakes, visit our guide on common cake problems and how to fix them.
- Using the Wrong Cocoa Powder: If you use dark, Dutch-processed cocoa powder, your dessert will look brown, not red. Dutch cocoa is washed in an alkaline solution, which neutralizes the acidity needed to react with the buttermilk and enhance the red dye. Always use natural cocoa powder.
- Ignoring Room Temperature Rules: Baking with cold eggs and cold buttermilk straight from the fridge will instantly solidify the softened butter in your mixing bowl, breaking the emulsion. This leads to a dense, uneven, and highly greasy crumb.
- Overmixing the Flour: Once the flour and buttermilk are introduced, mixing too aggressively develops tough gluten networks. Mix just until combined. Learn more about the exact science of ingredient ratios in our cake baking formulas and ratios guide.
Storing Tips for the Recipe
Proper, careful storage ensures your slice tastes just as beautifully moist and vibrant on day four as it did when it was freshly frosted.
- Refrigeration is Mandatory: Because the frosting is made with highly perishable dairy (cream cheese), this dessert must be stored in the refrigerator. Store it in an airtight cake dome to prevent the cold, dry air from staling the crumb. It will keep beautifully for up to 5 days.
- Prepping Ahead: You can bake the red layers up to two days in advance. Let them cool completely, wrap them tightly in a double layer of plastic wrap, and keep them at room temperature until you are ready to make the frosting and assemble.
- Freezing for Later: This specific crumb freezes impeccably. For the best results, freeze the unfrosted layers. Wrap each cooled layer tightly in plastic wrap and a layer of heavy-duty aluminum foil. Freeze for up to 3 months. Thaw overnight in the refrigerator before frosting.
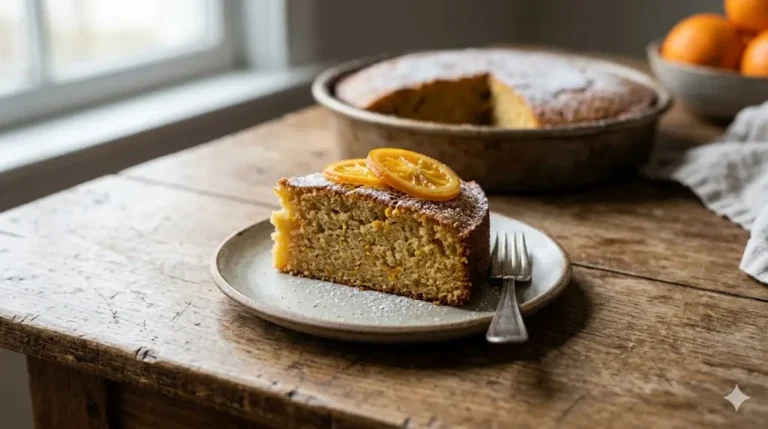
Conclusion
This Traditional Red Velvet Cake masterfully blends tender cake flour, rich natural cocoa, and tangy buttermilk into a visually stunning, velvet-textured dessert. By properly activating your baking soda and mastering the iconic cream cheese frosting, you achieve bakery-quality results that perfectly balance sweetness with a subtle, irresistible tartness every time.
Are you ready to bring the dramatic, delicious flair of this classic Southern centerpiece into your own kitchen? Try baking this sensational recipe today, share your beautifully frosted results in the review section, or leave a vibrant comment on our blog below! Don’t forget to subscribe to our weekly newsletter for more delicious updates, expert guides, and endless baking inspiration.
FAQs
1. Why is my red velvet cake brown instead of bright red?
The most common reason for a brownish hue is using too much cocoa powder or using the wrong type of cocoa. If you use Dutch-processed cocoa, its alkalinity darkens the batter. Additionally, if you don’t use enough food coloring, the natural brown of the cocoa will overpower the red dye. Stick to the 2 tablespoons of liquid dye or use highly concentrated gel colors.
2. Can I skip the white vinegar? It sounds weird in a dessert!
Absolutely do not skip the vinegar! You will not taste it in the final baked good. The acetic acid in the vinegar is absolutely essential to react with the baking soda. This chemical reaction creates the vital carbon dioxide bubbles that lift the heavy batter, giving the dessert its signature “velvet” fluffiness.
3. Can I use this exact recipe to make cupcakes instead?
Yes, this highly versatile batter adapts beautifully to cupcakes. Simply line a standard muffin tin with paper liners and fill each cup about two-thirds of the way full. Bake at the same temperature (350°F/175°C) but drastically reduce the baking time to roughly 18 to 22 minutes. Test the centers with a toothpick. For more tips on converting recipes, explore our cake baking tips and techniques.
4. Why is my cream cheese frosting runny and impossible to pipe?
Cream cheese frosting is notoriously soft. If it becomes runny, it is usually because the cream cheese or butter was too warm when mixed, or the environment is too hot. Never microwave your cream cheese to soften it! If your frosting is too soft, place the bowl in the refrigerator for 20 minutes to firm up the butterfat, then briefly re-whip it before applying it to the layers.
Traditional Red Velvet Cake 7 Best Baking
Ingredients
Equipment
Method
Step 1: Prep the Pans and Preheat
Begin by preheating your oven to 350°F (175°C). Getting the oven to a perfectly stable ambient temperature is vital; if the oven is too cold, the baking soda reaction will fizzle out before the crumb can set. Grease your cake pans generously with butter or a non-stick baking spray, and line the bottoms with parchment paper rounds. This step is a non-negotiable insurance policy against sticking.Step 2: Sift the Dry Ingredients
In a medium-sized mixing bowl, thoroughly sift together the cake flour, natural cocoa powder, and fine sea salt. Sifting is completely mandatory for this recipe—cocoa powder has a notorious tendency to form hard, bitter lumps that will ruin the texture of your finished slice. Whisk the sifted ingredients gently to ensure they are evenly dispersed.Step 3: Emulsify the Fats and Sugars
In the main bowl of your stand mixer fitted with the paddle attachment, beat the softened room-temperature butter on medium-high speed for 1 minute until smooth. Gradually pour in the granulated sugar and beat for an additional 2 minutes until pale and fluffy. Pour in the vegetable oil and beat for 1 more minute. The mixture might look slightly liquidy, but this dual-fat method is the secret to an unbelievably moist crumb.Step 4: Add the Eggs, Color, and Flavor
Reduce your mixer speed to medium-low. Add the room-temperature eggs one at a time, ensuring each egg is fully incorporated before adding the next. Stop to scrape down the sides of the bowl with your silicone spatula. Next, blend in the pure vanilla extract and the red food coloring. Be careful—liquid food coloring can easily stain countertops and clothing! Mix until the batter is a vibrant, uniform red.Step 5: Alternate Dry and Wet Ingredients
With the mixer on its absolute lowest speed, add the sifted dry flour mixture in three parts, alternating with the room-temperature buttermilk in two parts (Flour -> Buttermilk -> Flour -> Buttermilk -> Flour). Mix only until you see the last stubborn streaks of dry flour disappear. Overmixing at this fragile stage forcefully develops the gluten, transforming a tender dessert into a rubbery, dense disappointment.Step 6: The Crucial Chemical Reaction
Remove the bowl from the mixer. In a very small dish, combine your baking soda and distilled white vinegar. It will immediately fizz and bubble vigorously. Instantly pour this fizzing mixture into your red batter and gently, quickly fold it in with your silicone spatula. Do not dally—you want those gas bubbles trapped in the batter to ensure maximum lift in the oven.Step 7: Bake to Golden Perfection
Immediately divide the batter evenly between your two prepared pans. Tap the pans firmly on the kitchen counter twice to dislodge any large, trapped air bubbles that could cause tunnels in the baked crumb. Bake on the middle rack for 25 to 30 minutes. A wooden skewer inserted into the direct center should come out clean or with a few moist, tender crumbs attached.Step 8: Cooling and Frosting
Let the cakes cool in their pans on a wire rack for exactly 15 minutes before carefully turning them out to cool completely. Never frost a warm dessert, or your cream cheese will melt into a messy glaze. Once cooled, whip your cream cheese, butter, powdered sugar, and vanilla until airy, and frost your layers. For beautiful, professional presentation ideas and piping techniques, look into cake decoration for beginners, or try something structurally complex from our advanced cake decorating guide.