Go Back
Traditional Red Velvet Cake 7 Best Baking Secrets

Traditional Red Velvet Cake 7 Best Baking

Struggling with dry layers? Bake the perfect Traditional Red Velvet Cake with our 7 proven tips for a moist crumb and rich frosting. Discover, Learn, Try.
Prep Time 15 minutes
Cook Time 20 minutes
Total Time 35 minutes
Servings: 5 people
Course: Dessert
Cuisine: American
Calories: 250

Ingredients
  

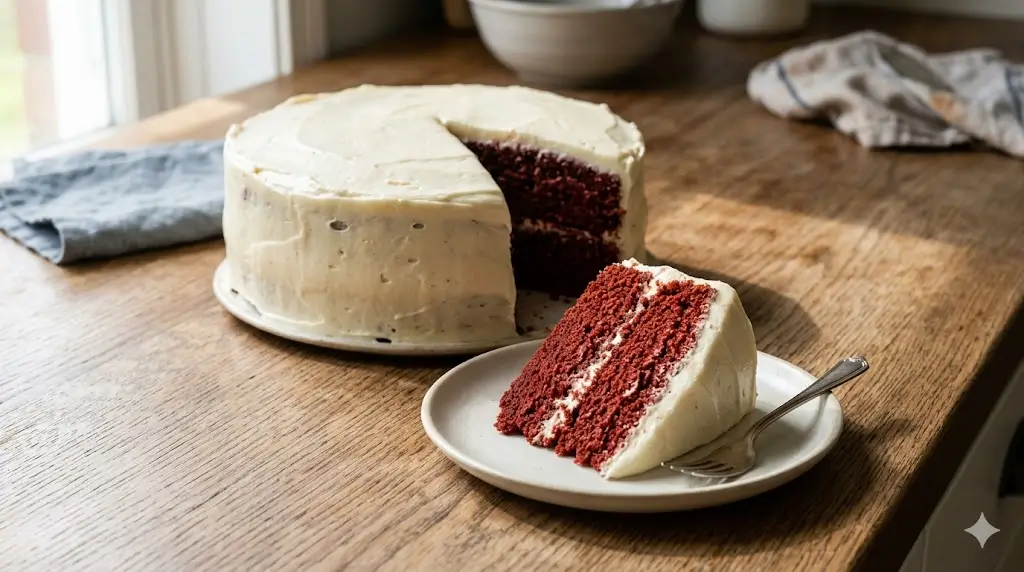
Cake Flour (2 ½ cups): Using cake flour rather than all-purpose flour is non-negotiable for a genuine "velvet" texture. Its lower protein content prevents excessive gluten development, resulting in a much softer crumb.Granulated Sugar (1 ½ cups): Sweetens the batter and acts as an abrasive during the creaming process, punching tiny air pockets into the fats to guarantee a lofty rise.Natural Unsweetened Cocoa Powder (2 tbsp): It is critical to use natural cocoa, not Dutch-processed. Natural cocoa is slightly acidic, which interacts perfectly with the baking soda and buttermilk to help enhance the reddish hue.Unsalted Butter (½ cup, softened) & Vegetable Oil (½ cup): This recipe utilizes a data-backed dual-fat system. The butter provides rich, irreplaceable flavor, while the oil—which remains liquid at room temperature—guarantees the dessert stays extraordinarily moist for days.Large Eggs (2 whole, room temperature): Act as the primary binding agent, providing the necessary structural integrity to hold the fluffy crumb together.Buttermilk (1 cup, room temperature): The high acidity in real buttermilk breaks down tough protein strands in the flour, yielding an incredibly tender bite.Liquid Red Food Coloring (2 tbsp): Provides the dramatic, iconic crimson color. For a deeper red, use a high-quality gel coloring mixed with a teaspoon of water.Pure Vanilla Extract (1 tbsp): Adds deep, floral aromatic notes that bridge the gap between the cocoa and the sweet frosting.Baking Soda (1 tsp) & Distilled White Vinegar (1 tsp): The ultimate secret to this recipe. When combined, they create carbon dioxide gas bubbles that aggressively lift the heavy batter, ensuring a feather-light texture.Fine Sea Salt (1 tsp): Enhances all the surrounding flavors, ensuring the sweetness does not become cloying.For the Cream Cheese Frosting: 16 oz full-fat block cream cheese (softened), ½ cup unsalted butter (softened), 4 cups sifted powdered sugar, and 2 tsp pure vanilla extract.

Equipment

  • Two 8-inch or 9-inch light-colored aluminum round cake pans
  • Parchment paper rounds (crucial for a flawless release)
  • A stand mixer with a paddle attachment, or a robust electric hand mixerLarge and medium mixing bowls (preferably glass or stainless steel)
  • A fine-mesh sieve or flour sifterA flexible silicone spatula for gentle folding and bowl scraping
  • Measuring cups and spoons (or a digital kitchen scale for optimal accuracy)
  • Sturdy wire cooling racks
  • An offset spatula for applying the frosting

Method
 

  1. Step 1: Prep the Pans and Preheat

    Begin by preheating your oven to 350°F (175°C). Getting the oven to a perfectly stable ambient temperature is vital; if the oven is too cold, the baking soda reaction will fizzle out before the crumb can set. Grease your cake pans generously with butter or a non-stick baking spray, and line the bottoms with parchment paper rounds. This step is a non-negotiable insurance policy against sticking.
  2. Step 2: Sift the Dry Ingredients

    In a medium-sized mixing bowl, thoroughly sift together the cake flour, natural cocoa powder, and fine sea salt. Sifting is completely mandatory for this recipe—cocoa powder has a notorious tendency to form hard, bitter lumps that will ruin the texture of your finished slice. Whisk the sifted ingredients gently to ensure they are evenly dispersed.
  3. Step 3: Emulsify the Fats and Sugars

    In the main bowl of your stand mixer fitted with the paddle attachment, beat the softened room-temperature butter on medium-high speed for 1 minute until smooth. Gradually pour in the granulated sugar and beat for an additional 2 minutes until pale and fluffy. Pour in the vegetable oil and beat for 1 more minute. The mixture might look slightly liquidy, but this dual-fat method is the secret to an unbelievably moist crumb.
  4. Step 4: Add the Eggs, Color, and Flavor

    Reduce your mixer speed to medium-low. Add the room-temperature eggs one at a time, ensuring each egg is fully incorporated before adding the next. Stop to scrape down the sides of the bowl with your silicone spatula. Next, blend in the pure vanilla extract and the red food coloring. Be careful—liquid food coloring can easily stain countertops and clothing! Mix until the batter is a vibrant, uniform red.
  5. Step 5: Alternate Dry and Wet Ingredients

    With the mixer on its absolute lowest speed, add the sifted dry flour mixture in three parts, alternating with the room-temperature buttermilk in two parts (Flour -> Buttermilk -> Flour -> Buttermilk -> Flour). Mix only until you see the last stubborn streaks of dry flour disappear. Overmixing at this fragile stage forcefully develops the gluten, transforming a tender dessert into a rubbery, dense disappointment.
  6. Step 6: The Crucial Chemical Reaction

    Remove the bowl from the mixer. In a very small dish, combine your baking soda and distilled white vinegar. It will immediately fizz and bubble vigorously. Instantly pour this fizzing mixture into your red batter and gently, quickly fold it in with your silicone spatula. Do not dally—you want those gas bubbles trapped in the batter to ensure maximum lift in the oven.
  7. Step 7: Bake to Golden Perfection

    Immediately divide the batter evenly between your two prepared pans. Tap the pans firmly on the kitchen counter twice to dislodge any large, trapped air bubbles that could cause tunnels in the baked crumb. Bake on the middle rack for 25 to 30 minutes. A wooden skewer inserted into the direct center should come out clean or with a few moist, tender crumbs attached.
  8. Step 8: Cooling and Frosting

    Let the cakes cool in their pans on a wire rack for exactly 15 minutes before carefully turning them out to cool completely. Never frost a warm dessert, or your cream cheese will melt into a messy glaze. Once cooled, whip your cream cheese, butter, powdered sugar, and vanilla until airy, and frost your layers. For beautiful, professional presentation ideas and piping techniques, look into cake decoration for beginners, or try something structurally complex from our advanced cake decorating guide.