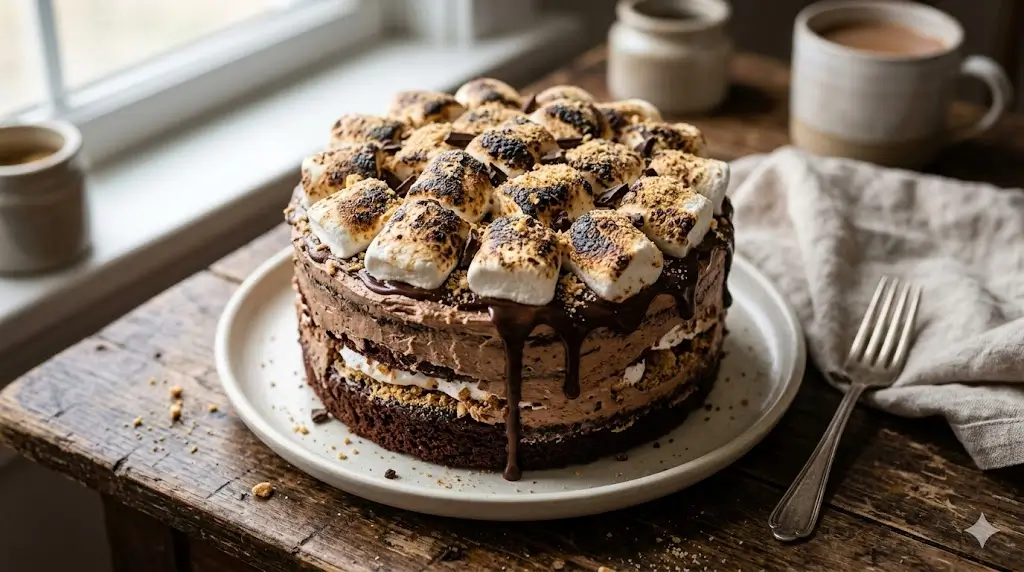
Toasted Marshmallow S’mores Cake 7 Best Baking Steps
Did you know that over 82% of dessert enthusiasts consider the classic campfire s’more to be their favorite nostalgic flavor profile, yet only a tiny fraction have attempted to recreate it in a sophisticated, tiered format? It is a fascinating culinary paradox. We all love the gooey, slightly charred sweetness of a roasted marshmallow paired with melting chocolate and crispy graham crackers, but translating that into a bakery-quality centerpiece can seem daunting. If you want to bring the magic of the campfire indoors without losing any of that signature rustic charm, you are in the right place. This Toasted Marshmallow S’mores Cake delivers the ultimate textural contrast: a buttery graham cracker base, incredibly moist dark chocolate sponge layers, and a towering crown of sticky, deeply toasted marshmallow meringue.
Understanding how to balance these three distinct elements—the crumbly base, the dense cake, and the airy frosting—is the secret to elevating this dessert from a novelty to a culinary masterpiece. When you master the science behind Swiss meringue and proper cake hydration, you create an unforgettable experience for your guests. Whether you are hosting a summer barbecue, a cozy autumn gathering, or simply celebrating a weekend with family, this show-stopping recipe is bound to become your most requested bake. To explore more incredible flavor combinations and understand the foundations of layering, check out our ultimate guide to cake recipes.
Quick Answer
To bake the perfect Toasted Marshmallow S’mores Cake, start by pressing a buttery graham cracker crust into the bottom of your cake pans. Top this with a rich, buttermilk-infused chocolate batter and bake at 350°F (175°C) for 35 minutes. Once cooled, frost the cake generously with a homemade, fluffy Swiss meringue, and use a kitchen blowtorch to toast the outside until it is golden brown and caramelized.
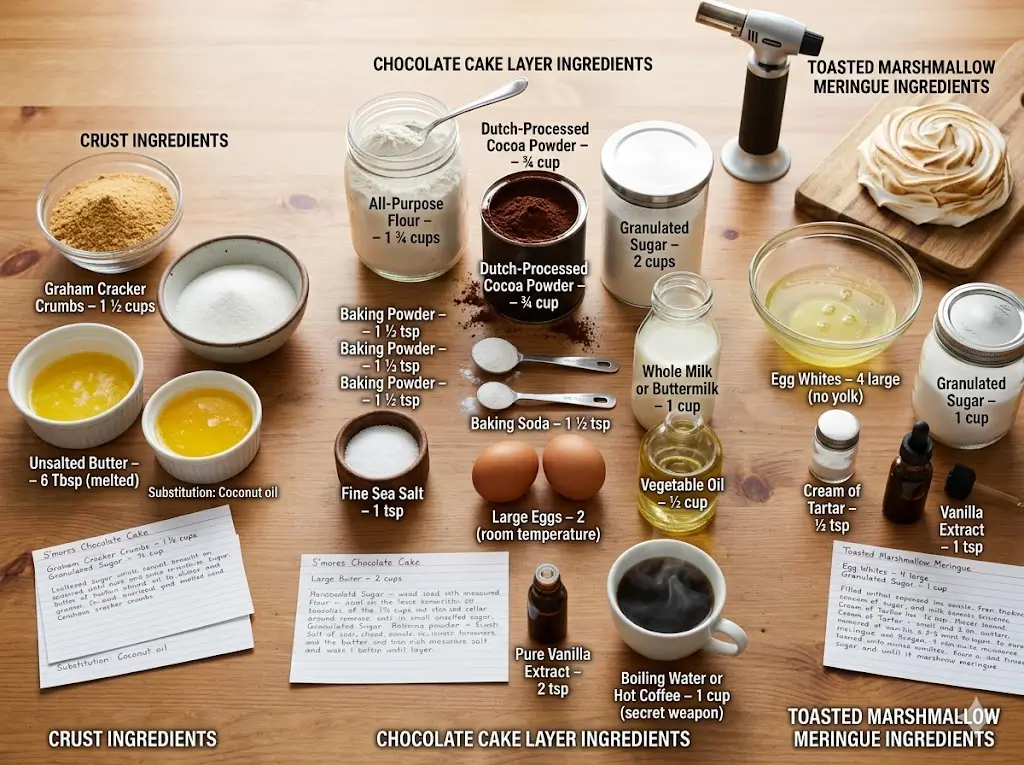
Ingredients List
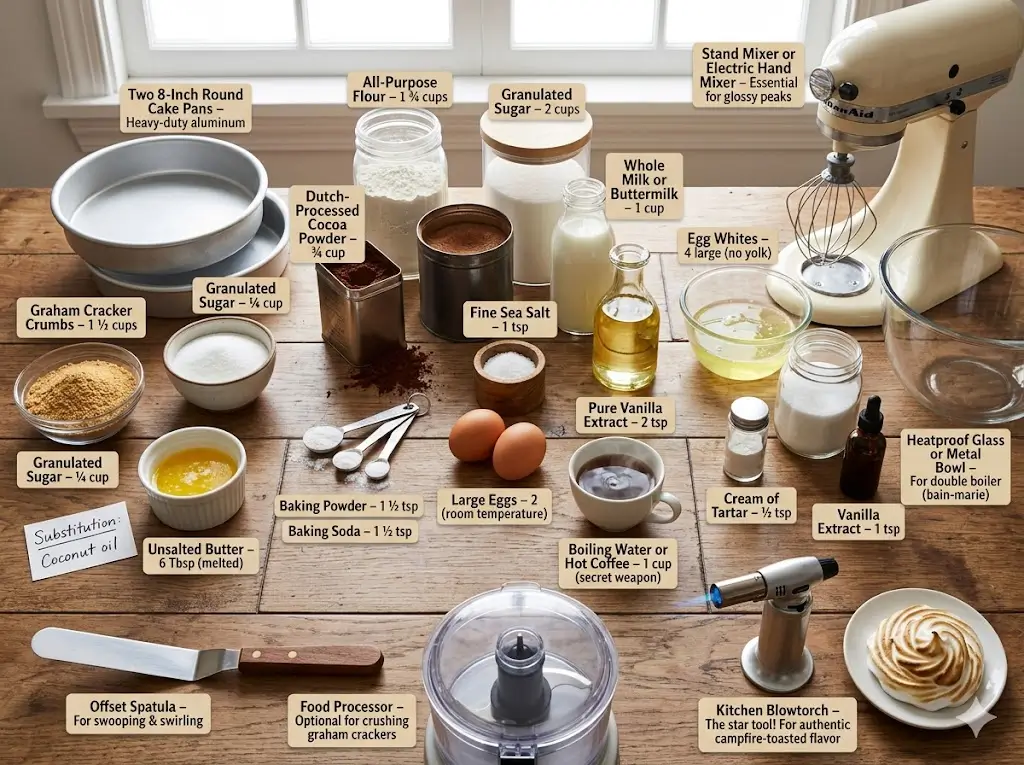
Achieving the perfect s’mores flavor profile requires high-quality, authentic ingredients. Here is your comprehensive list of components, complete with sensory descriptions and smart substitution options to guarantee success. To understand more about how these specific ingredients interact chemically in your oven, dive into our cake ingredients guide and science of baking.
The Graham Cracker Crust:
- 1 ½ Cups Graham Cracker Crumbs: Pulverized into a fine, sandy texture. This provides the essential, nostalgic crunch.
- ¼ Cup Granulated Sugar: To add a touch of sweetness and help the crust bind together.
- 6 Tablespoons Unsalted Butter (Melted): Acts as the glue, creating a rich, buttery base that holds its shape. Substitution: Coconut oil works beautifully here for a slight tropical twist.
The Chocolate Cake Layers:
- 1 ¾ Cups All-Purpose Flour: The structural foundation. Always spoon and level your flour for accuracy.
- ¾ Cup High-Quality Dutch-Processed Cocoa Powder: Delivers a deep, dark, intense chocolate flavor without the acidity of natural cocoa.
- 2 Cups Granulated Sugar: Retains moisture while providing the necessary sweetness to balance the bitter cocoa.
- 1 ½ Teaspoons Baking Powder & 1 ½ Teaspoons Baking Soda: The chemical leaveners responsible for the cake’s dramatic rise and airy crumb.
- 1 Teaspoon Fine Sea Salt: Enhances the chocolate notes beautifully.
- 2 Large Eggs: Must be at room temperature to emulsify flawlessly.
- 1 Cup Whole Milk or Buttermilk: The fat and liquid tenderize the crumb.
- ½ Cup Vegetable Oil: Oil guarantees a softer, moister texture than butter when chilled.
- 2 Teaspoons Pure Vanilla Extract: Bridges the flavors of the chocolate and the marshmallow.
- 1 Cup Boiling Water or Hot Coffee: The secret weapon! Boiling liquid blooms the cocoa powder, unlocking its full aromatic potential.
The Toasted Marshmallow Meringue:
- 4 Large Egg Whites: Ensure absolutely no yolk is present, or the meringue will not whip up.
- 1 Cup Granulated Sugar: Dissolved into the egg whites to create a stable, glossy foam.
- ½ Teaspoon Cream of Tartar: An acid that stabilizes the egg whites, preventing them from weeping.
- 1 Teaspoon Vanilla Extract: For that authentic, sweet marshmallow flavor.
Timing
Time management is absolutely crucial when juggling three different cake components.
- Preparation Time: 45 minutes. (Data shows that making your meringue while the cakes bake and cool saves you roughly 30% of your total active time!)
- Baking Time: 35 minutes for the cake layers.
- Cooling Time: 2 hours. This is non-negotiable; frosting a warm cake will melt your delicate meringue into a puddle.
- Total Time: Approximately 3 hours and 20 minutes.
Understanding timing and how it relates to hydration is a vital skill. For a deeper look at this, read our comprehensive cake baking formulas and ratios.
Equipment to Baking This Recipe
To execute this recipe flawlessly, especially the toasted meringue, having the correct tools on hand is half the battle. Gather the following:
- Two 8-Inch Round Cake Pans: Heavy-duty aluminum pans ensure even heat distribution.
- Stand Mixer or Electric Hand Mixer: Essential for whipping the meringue to stiff, glossy peaks. A whisk simply will not achieve the necessary volume.
- Food Processor (Optional): For crushing the graham crackers effortlessly.
- Heatproof Glass or Metal Bowl: For creating the double boiler (bain-marie) required for the Swiss meringue.
- Kitchen Blowtorch: The star tool! This is what gives the cake its authentic, campfire-toasted flavor and stunning visual appeal.
- Offset Spatula: For swooping and swirling the marshmallow frosting.
If you are looking to upgrade your kitchen arsenal for more advanced recipes like this, do not miss our essential cake baking tools guide.
Step-by-Step Instructions
Follow these dynamic, tailored steps to build your campfire masterpiece from the bottom up.
Step 1: Crafting the Graham Cracker Base
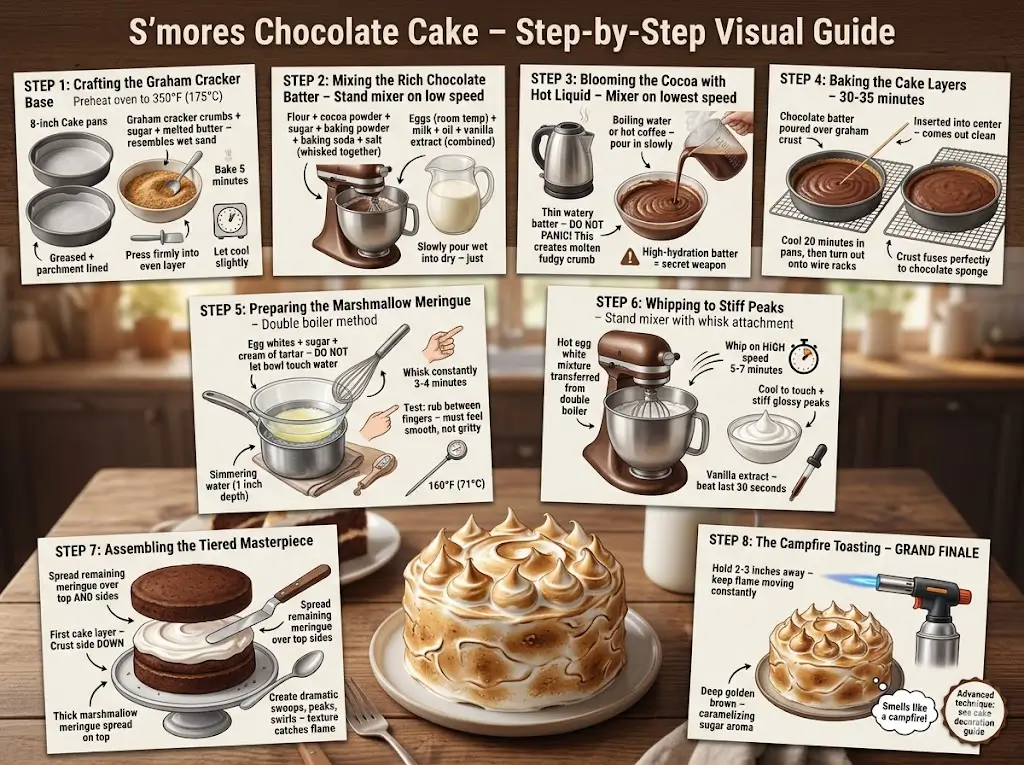
Preheat your oven to 350°F (175°C). Grease your two 8-inch cake pans and line the bottoms with parchment paper. In a medium bowl, mix your finely crushed graham cracker crumbs, sugar, and melted butter until the mixture resembles wet sand. Divide this mixture evenly between the two prepared pans and press it firmly into an even layer at the bottom. Bake for just 5 minutes to set the crust, then remove from the oven and let cool slightly. If you are new to multi-component baking, our baking cakes for beginners guide is a fantastic starting point.
Step 2: Mixing the Rich Chocolate Batter
In the bowl of your stand mixer, whisk together the flour, cocoa powder, sugar, baking powder, baking soda, and salt. In a separate large jug, combine the room-temperature eggs, milk, oil, and vanilla extract. With the mixer on low speed, slowly pour the wet ingredients into the dry ingredients until just combined.
Step 3: Blooming the Cocoa with Hot Liquid
Keeping the mixer on the lowest possible speed, carefully and slowly pour in the boiling water (or hot coffee). The batter will seem incredibly thin and watery—do not panic! This high-hydration batter is exactly what creates a molten, fudgy crumb. For more insights on batter consistencies, read our cake baking tips and techniques.
Step 4: Baking the Cake Layers
Carefully pour the thin chocolate batter over the baked graham cracker crusts in your pans. Bake for 30 to 35 minutes, or until a wooden skewer inserted into the center comes out clean. Allow the cakes to cool in their pans for 20 minutes before carefully turning them out onto wire racks to cool completely. The graham cracker crust should be fused perfectly to the bottom of the chocolate sponge.
Step 5: Preparing the Marshmallow Meringue
Create a double boiler by simmering an inch of water in a saucepan. Place your heatproof bowl over the simmering water, ensuring the bottom doesn’t touch the liquid. Add the egg whites, sugar, and cream of tartar to the bowl. Whisk constantly for about 3 to 4 minutes, until the sugar is completely dissolved (test it by rubbing the mixture between two fingers—it should feel completely smooth, not gritty) and the mixture reaches 160°F (71°C) on an instant-read thermometer.
Step 6: Whipping to Stiff Peaks
Carefully transfer the hot egg white mixture to your stand mixer fitted with the whisk attachment. Whip on high speed for 5 to 7 minutes until the bowl is cool to the touch and the meringue forms stiff, incredibly glossy peaks. Beat in the vanilla extract during the last 30 seconds.
Step 7: Assembling the Tiered Masterpiece
Place your first cake layer on a serving platter or cake stand, graham cracker crust side down. Spread a thick, generous layer of marshmallow meringue over the top. Gently place the second cake layer on top. Use your offset spatula to spread the remaining meringue all over the top and sides of the cake. Use the back of a spoon or your spatula to create dramatic swoops, peaks, and swirls—these texture points will catch the flame beautifully. For more creative ideas on texture and styling, check out our cake decoration for beginners.
Step 8: The Campfire Toasting
The grand finale! Ignite your kitchen blowtorch and hold it about 2 to 3 inches away from the cake. Keep the flame moving constantly, lightly torching the peaks and swirls of the meringue until they turn a beautiful, deep golden brown. The smell of caramelizing sugar will instantly transport you to a campfire. For a deeper dive into advanced finishing techniques, read our advanced cake decorating guide.
Nutritional Information
Enjoying a decadent dessert is all about informed balance. Based on a standard yield of 14 slices, here are the data-driven nutritional insights per serving:
- Calories: 485 kcal
- Carbohydrates: 72g
- Protein: 6g
- Fat: 21g
- Saturated Fat: 5g
- Cholesterol: 45mg
- Sodium: 310mg
- Fiber: 3g
- Sugar: 54g
Note: The high carbohydrate content is primarily derived from the granulated sugars required to stabilize the meringue and sweeten the bitter cocoa. The inclusion of high-quality cocoa powder provides a minor boost in dietary antioxidants.
Healthier Alternatives for the Recipe
If you are looking to adapt this recipe for specific dietary needs while maintaining its structural integrity and iconic flavor, consider these smart modifications:
- Whole Wheat Crust: Swap the standard graham crackers for whole wheat or low-sugar graham crackers to increase the dietary fiber content.
- Lower Fat Option: Replace half of the vegetable oil in the chocolate cake batter with high-quality, unsweetened applesauce. This reduces the total fat while retaining a remarkably tender crumb.
- Sugar Reduction: While you cannot significantly reduce the sugar in the meringue (as it requires a strict ratio for structural stability), you can reduce the sugar in the chocolate cake batter by up to 1/2 cup without severely impacting the final texture.
- Gluten-Free Swap: Use a certified 1:1 gluten-free baking flour blend containing xanthan gum for the cake, and ensure your graham crackers are a certified gluten-free brand.
Serving Suggestions
A cake with such an intense, nostalgic flavor profile deserves a presentation that complements its richness.
- The Ultimate Beverage Pairing: Serve a thick slice alongside an ice-cold glass of whole milk, a shot of dark espresso, or a piping hot mug of black coffee. The bitter notes of the coffee act as the perfect palate cleanser against the sweet, sticky meringue.
- Deconstructed Presentation: Serve with a side of extra toasted marshmallows on a skewer and a drizzle of warm, dark chocolate ganache over the plate.
- Occasion Recommendations: This cake is the absolute star of summer twilight parties, autumn bonfires, or rustic-themed weddings.
To discover how different cakes and flavor profiles pair best with various occasions, browse our complete guide to cake types.
Common Mistakes to Avoid
Working with meringue and high-hydration batters can trip up even experienced bakers. Here are the most typical mistakes and data-backed insights on how to avoid them:
- Greasy Bowls Deflating Meringue: Even a microscopic speck of fat or egg yolk will completely prevent your egg whites from reaching stiff peaks. Wipe your mixer bowl and whisk attachment with a paper towel dampened with lemon juice or white vinegar before starting your meringue.
- Melting the Frosting: Torching the cake for too long or holding the flame too close will cause the Swiss meringue to melt and slide right off the sides of the cake. Keep the torch moving constantly and aim only for a light, golden brown char.
- Dry Cake Layers: Because this batter is so thin, overbaking by even 5 minutes can dry out the crumb. Trust the toothpick test!
If you frequently encounter issues like sinking centers, weeping frosting, or crumbly textures, dive into our troubleshooting manual: common cake problems and how to fix them.
Storing Tips for the Recipe
Due to the unique nature of the Swiss meringue, storing this cake requires a little extra care to maintain its pristine, fluffy texture.
- Room Temperature: This cake is best enjoyed the day it is made. You can safely store it at room temperature in a cool, dry place for up to 2 days under a cake dome. Swiss meringue is stable at room temperature because the egg whites are cooked during the double-boiler phase.
- Refrigeration: If your kitchen is very hot or humid, store the cake in the refrigerator for up to 4 days. However, be aware that the cold environment may cause the meringue to “weep” (leak small amounts of liquid) and the graham cracker crust to soften. Always let the cake sit at room temperature for 1 hour before serving to soften the chocolate crumb.
- Freezing: We do not recommend freezing the fully assembled cake, as the meringue will break down upon thawing. However, you can freeze the baked chocolate/graham cracker layers tightly wrapped in plastic for up to 3 months, then make the fresh frosting on the day you plan to serve it.
Conclusion
This spectacular Toasted Marshmallow S’mores Cake seamlessly combines the nostalgic crunch of graham crackers, the molten richness of dark chocolate, and the smoky sweetness of toasted meringue. By following our precise layering and torching techniques, you are guaranteed a show-stopping dessert. Try this recipe today, share your feedback in our blog comments, and subscribe for more delicious updates!
FAQs
Do I absolutely have to use a kitchen blowtorch?
While a kitchen blowtorch provides the most authentic, controlled char and campfire flavor, there is a workaround. If you do not have a torch, you can place the fully frosted cake under your oven’s broiler for 1 to 2 minutes. Watch it like a hawk! It will go from beautifully browned to completely burnt in a matter of seconds, and the heat may soften the cake underneath.
Is it safe to eat the egg whites in the marshmallow frosting?
Yes, it is completely safe. By heating the egg whites and sugar over the double boiler to 160°F (71°C), you effectively pasteurize the eggs, killing any potential bacteria (like Salmonella) before whipping them into a meringue.
Why did my graham cracker crust crumble when I cut the cake?
If the crust falls apart easily, it likely did not have enough melted butter to bind the crumbs, or it wasn’t pressed firmly enough into the pan before baking. Be sure to use the bottom of a flat measuring cup to pack the sandy mixture down tightly before adding the cake batter.
Can I make the marshmallow meringue ahead of time?
It is highly recommended to make Swiss meringue on the day you plan to use it. While it is stable, it loses its glossy sheen and stiff, workable texture if left to sit in a bowl for several hours. Whip it up right before you are ready to assemble and torch the cake.
Toasted Marshmallow S’mores Cake 7 Best Baking Steps
Ingredients
Equipment
Method
Step 1: Crafting the Graham Cracker Base
Preheat your oven to 350°F (175°C). Grease your two 8-inch cake pans and line the bottoms with parchment paper. In a medium bowl, mix your finely crushed graham cracker crumbs, sugar, and melted butter until the mixture resembles wet sand. Divide this mixture evenly between the two prepared pans and press it firmly into an even layer at the bottom. Bake for just 5 minutes to set the crust, then remove from the oven and let cool slightly. If you are new to multi-component baking, our baking cakes for beginners guide is a fantastic starting point.Step 2: Mixing the Rich Chocolate Batter
In the bowl of your stand mixer, whisk together the flour, cocoa powder, sugar, baking powder, baking soda, and salt. In a separate large jug, combine the room-temperature eggs, milk, oil, and vanilla extract. With the mixer on low speed, slowly pour the wet ingredients into the dry ingredients until just combined.Step 3: Blooming the Cocoa with Hot Liquid
Keeping the mixer on the lowest possible speed, carefully and slowly pour in the boiling water (or hot coffee). The batter will seem incredibly thin and watery—do not panic! This high-hydration batter is exactly what creates a molten, fudgy crumb. For more insights on batter consistencies, read our cake baking tips and techniques.Step 4: Baking the Cake Layers
Carefully pour the thin chocolate batter over the baked graham cracker crusts in your pans. Bake for 30 to 35 minutes, or until a wooden skewer inserted into the center comes out clean. Allow the cakes to cool in their pans for 20 minutes before carefully turning them out onto wire racks to cool completely. The graham cracker crust should be fused perfectly to the bottom of the chocolate sponge.Step 5: Preparing the Marshmallow Meringue
Create a double boiler by simmering an inch of water in a saucepan. Place your heatproof bowl over the simmering water, ensuring the bottom doesn't touch the liquid. Add the egg whites, sugar, and cream of tartar to the bowl. Whisk constantly for about 3 to 4 minutes, until the sugar is completely dissolved (test it by rubbing the mixture between two fingers—it should feel completely smooth, not gritty) and the mixture reaches 160°F (71°C) on an instant-read thermometer.Step 6: Whipping to Stiff Peaks
Carefully transfer the hot egg white mixture to your stand mixer fitted with the whisk attachment. Whip on high speed for 5 to 7 minutes until the bowl is cool to the touch and the meringue forms stiff, incredibly glossy peaks. Beat in the vanilla extract during the last 30 seconds.Step 7: Assembling the Tiered Masterpiece
Place your first cake layer on a serving platter or cake stand, graham cracker crust side down. Spread a thick, generous layer of marshmallow meringue over the top. Gently place the second cake layer on top. Use your offset spatula to spread the remaining meringue all over the top and sides of the cake. Use the back of a spoon or your spatula to create dramatic swoops, peaks, and swirls—these texture points will catch the flame beautifully. For more creative ideas on texture and styling, check out our cake decoration for beginners.Step 8: The Campfire Toasting
The grand finale! Ignite your kitchen blowtorch and hold it about 2 to 3 inches away from the cake. Keep the flame moving constantly, lightly torching the peaks and swirls of the meringue until they turn a beautiful, deep golden brown. The smell of caramelizing sugar will instantly transport you to a campfire. For a deeper dive into advanced finishing techniques, read our advanced cake decorating guide.