Ingredients
Equipment
Method
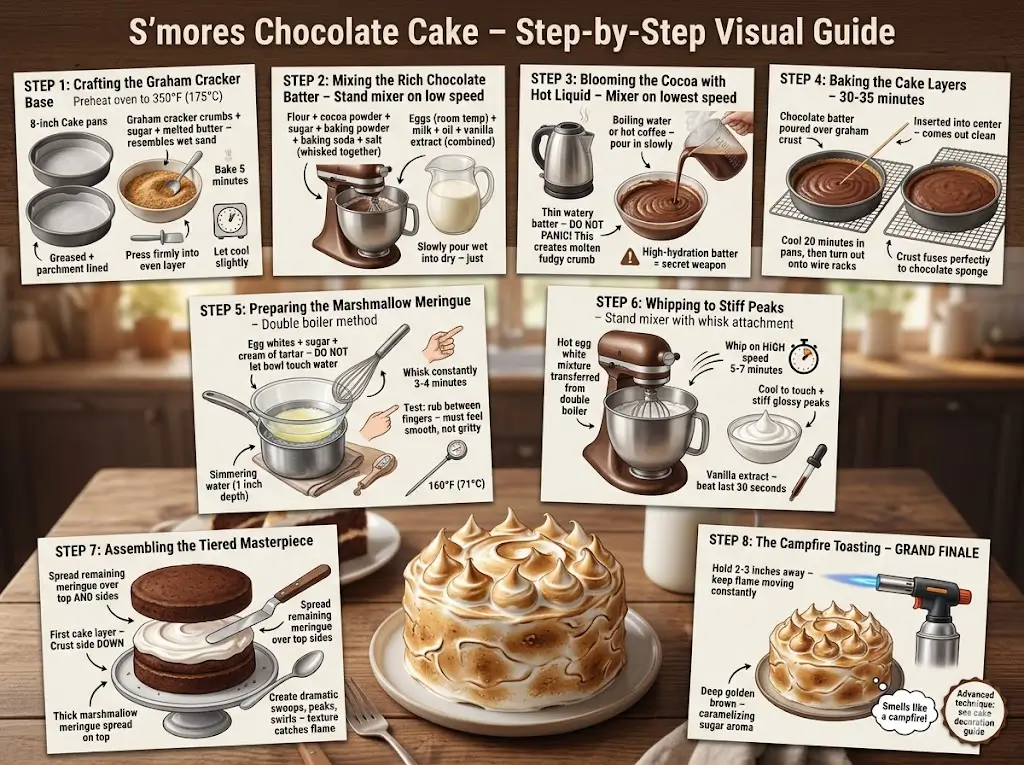
Step 1: Crafting the Graham Cracker Base
Preheat your oven to 350°F (175°C). Grease your two 8-inch cake pans and line the bottoms with parchment paper. In a medium bowl, mix your finely crushed graham cracker crumbs, sugar, and melted butter until the mixture resembles wet sand. Divide this mixture evenly between the two prepared pans and press it firmly into an even layer at the bottom. Bake for just 5 minutes to set the crust, then remove from the oven and let cool slightly. If you are new to multi-component baking, our baking cakes for beginners guide is a fantastic starting point.Step 2: Mixing the Rich Chocolate Batter
In the bowl of your stand mixer, whisk together the flour, cocoa powder, sugar, baking powder, baking soda, and salt. In a separate large jug, combine the room-temperature eggs, milk, oil, and vanilla extract. With the mixer on low speed, slowly pour the wet ingredients into the dry ingredients until just combined.Step 3: Blooming the Cocoa with Hot Liquid
Keeping the mixer on the lowest possible speed, carefully and slowly pour in the boiling water (or hot coffee). The batter will seem incredibly thin and watery—do not panic! This high-hydration batter is exactly what creates a molten, fudgy crumb. For more insights on batter consistencies, read our cake baking tips and techniques.Step 4: Baking the Cake Layers
Carefully pour the thin chocolate batter over the baked graham cracker crusts in your pans. Bake for 30 to 35 minutes, or until a wooden skewer inserted into the center comes out clean. Allow the cakes to cool in their pans for 20 minutes before carefully turning them out onto wire racks to cool completely. The graham cracker crust should be fused perfectly to the bottom of the chocolate sponge.Step 5: Preparing the Marshmallow Meringue
Create a double boiler by simmering an inch of water in a saucepan. Place your heatproof bowl over the simmering water, ensuring the bottom doesn't touch the liquid. Add the egg whites, sugar, and cream of tartar to the bowl. Whisk constantly for about 3 to 4 minutes, until the sugar is completely dissolved (test it by rubbing the mixture between two fingers—it should feel completely smooth, not gritty) and the mixture reaches 160°F (71°C) on an instant-read thermometer.Step 6: Whipping to Stiff Peaks
Carefully transfer the hot egg white mixture to your stand mixer fitted with the whisk attachment. Whip on high speed for 5 to 7 minutes until the bowl is cool to the touch and the meringue forms stiff, incredibly glossy peaks. Beat in the vanilla extract during the last 30 seconds.Step 7: Assembling the Tiered Masterpiece
Place your first cake layer on a serving platter or cake stand, graham cracker crust side down. Spread a thick, generous layer of marshmallow meringue over the top. Gently place the second cake layer on top. Use your offset spatula to spread the remaining meringue all over the top and sides of the cake. Use the back of a spoon or your spatula to create dramatic swoops, peaks, and swirls—these texture points will catch the flame beautifully. For more creative ideas on texture and styling, check out our cake decoration for beginners.Step 8: The Campfire Toasting
The grand finale! Ignite your kitchen blowtorch and hold it about 2 to 3 inches away from the cake. Keep the flame moving constantly, lightly torching the peaks and swirls of the meringue until they turn a beautiful, deep golden brown. The smell of caramelizing sugar will instantly transport you to a campfire. For a deeper dive into advanced finishing techniques, read our advanced cake decorating guide.