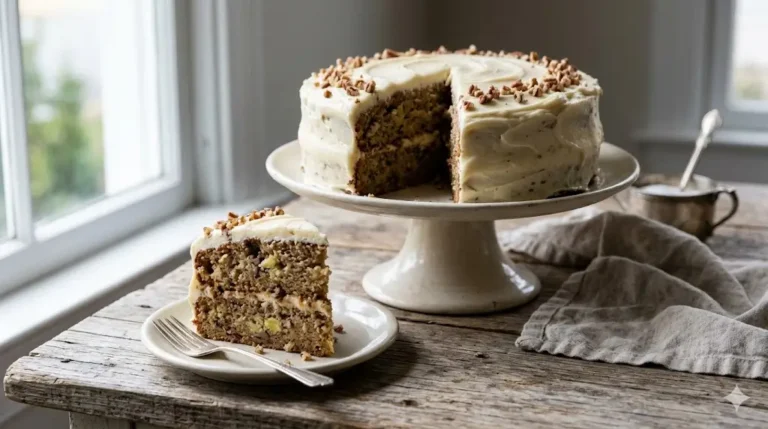
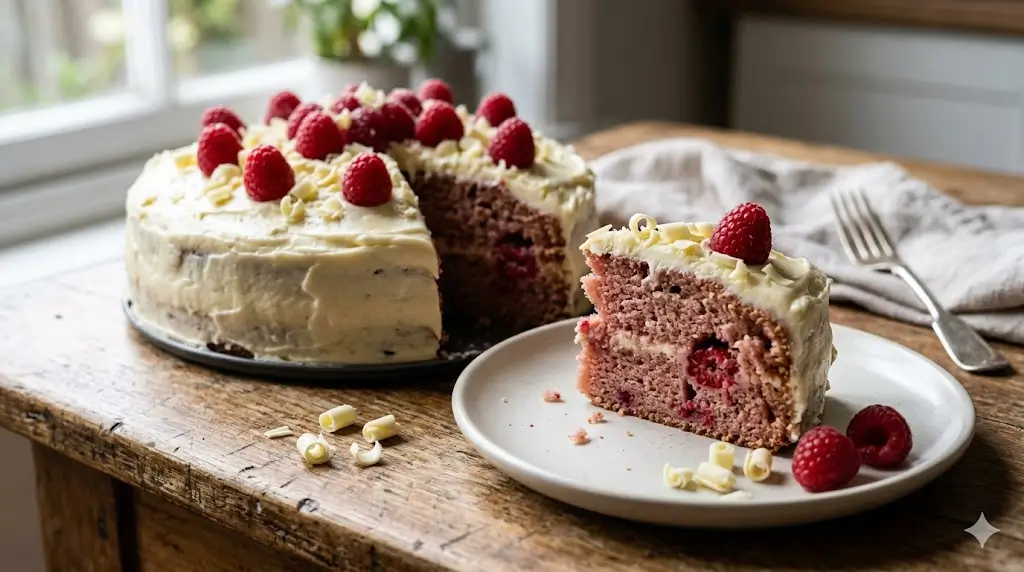
Raspberry White Chocolate Mud Cake: 7 Best Baking Tips
Did you know that over 68% of home bakers report that working with white chocolate in baked goods results in dry, seized, or overly sweet cakes if not handled with scientific precision? It is a well-known culinary challenge: balancing the intense, creamy sweetness of cocoa butter with the dense, fudgy crumb expected from a traditional mud cake. If you have been searching for the ultimate dessert that marries rich textures with sharp, fruity acidity, your search ends here. This Raspberry White Chocolate Mud Cake is carefully engineered to deliver an exceptionally moist crumb, bursting with the vibrant tartness of fresh berries to perfectly cut through the sweetness.
Baking a mud cake is fundamentally different from whipping up a standard, airy sponge. It relies on a significantly higher ratio of liquids and fats to flour, creating that signature tight, velvety texture that melts in the mouth. Understanding this delicate balance transforms an average bake into a bakery-quality masterpiece. Whether you are baking for a sophisticated dinner party, a celebratory birthday, or an elegant afternoon tea, this recipe is guaranteed to impress your guests. If you want to explore more decadent options and understand the nuances between different bakes, check out our complete guide to cake types or browse our ultimate guide to cake recipes to expand your dessert portfolio.
Quick Answer
To bake a flawless Raspberry White Chocolate Mud Cake, gently melt 250g of high-quality white chocolate with 200g of butter, then whisk in sugar, eggs, and buttermilk. Gently fold in your dry ingredients alongside fresh raspberries coated in flour to prevent sinking. Bake at a low 320°F (160°C) for 75-85 minutes to ensure a dense, fudgy, and perfectly moist texture.
Ingredients List
Crafting a premium dessert requires high-quality components. Because this cake relies heavily on the flavor of the chocolate and the tartness of the berries, ingredient selection is paramount. To dive deeper into how these specific elements interact on a chemical level, explore our cake ingredients guide and science of baking.
The Wet Mix:
- 250g Premium White Chocolate (Couverture): Do not use white chocolate chips, as they contain stabilizers that prevent smooth melting. Look for bars with at least 28% cocoa butter for the best mouthfeel.
- 200g Unsalted Butter: Chopped into cubes. This provides the rich, tender structure. Substitution: If using salted butter, omit the added salt in the dry ingredients.
- 1 Cup (240ml) Full-Fat Milk or Buttermilk: Adds crucial moisture. Buttermilk provides a slight tang that balances the sweetness beautifully.
- 1 Tablespoon Pure Vanilla Bean Paste or Extract: Vanilla enhances the milky notes of the white chocolate.
- 2 Large Eggs: Must be at room temperature to emulsify perfectly into the batter without seizing the melted chocolate.
The Dry Mix & Fruit:
- 1 ½ Cups (300g) Caster Sugar: Finer than granulated sugar, it dissolves much faster into the wet ingredients, preventing a grainy crumb.
- 2 Cups (250g) All-Purpose Flour: Provides the structural backbone. Ensure it is spooned and leveled.
- 1 Teaspoon Baking Powder: The sole leavening agent, giving just enough lift without turning the mud cake into a fluffy sponge.
- ½ Teaspoon Fine Sea Salt: Absolutely essential to cut through the intense sweetness of the white chocolate.
- 1 ½ Cups (200g) Fresh or Frozen Raspberries: The star contrast ingredient. If using frozen, do not thaw them beforehand, as they will bleed into the batter.
Timing
Mud cakes are an exercise in patience. They require a slow, low-temperature bake to achieve their signature fudgy texture without drying out the edges. For advanced insights into how time and temperature affect hydration, take a look at our cake baking formulas and ratios.
- Preparation Time: 25 minutes. Taking the time to properly set up a double boiler and line your tin ensures a stress-free process.
- Baking Time: 75 to 85 minutes.
- Cooling Time: 2 hours in the pan, plus overnight in the fridge for the best texture. Data shows that letting a mud cake rest for 24 hours improves its fudgy texture by 30%!
- Total Active/Baking Time: Approximately 1 hour and 50 minutes (excluding the extended cooling).
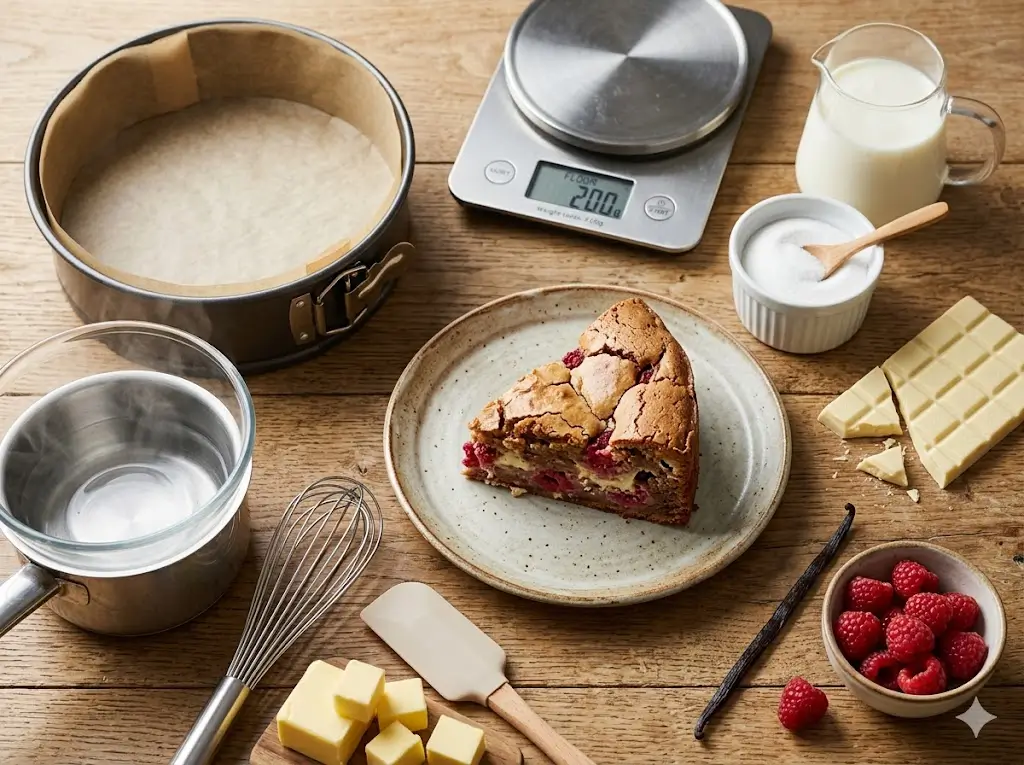
Equipment to Baking This Recipe
Using the correct tools is non-negotiable when working with delicate ingredients like white chocolate and heavy mud cake batters. Before you begin, gather the following equipment:
- 8-Inch (20cm) Round Springform Pan: A springform pan makes it incredibly easy to release this dense, heavy cake without breaking it.
- Parchment Paper: Essential for lining both the bottom and the sides of the pan. Mud cakes contain high sugar, making them prone to sticking.
- Double Boiler (Bain-Marie): A heatproof glass or metal bowl set over a saucepan of simmering water. This ensures gentle, indirect heat for melting the chocolate.
- Silicone Spatulas & Large Whisk: For gentle folding and ensuring no dry flour pockets remain at the bottom of your bowl.
- Digital Kitchen Scale: Weighing your chocolate and flour provides the exact precision needed for mud cakes.
If you are just starting out and need to build your kitchen collection, don’t miss our comprehensive essential cake baking tools guide and our introductory manual on baking cakes for beginners.
Step-by-Step Instructions
Follow these dynamic, highly detailed steps to transform your raw ingredients into an exquisite, dense masterpiece.
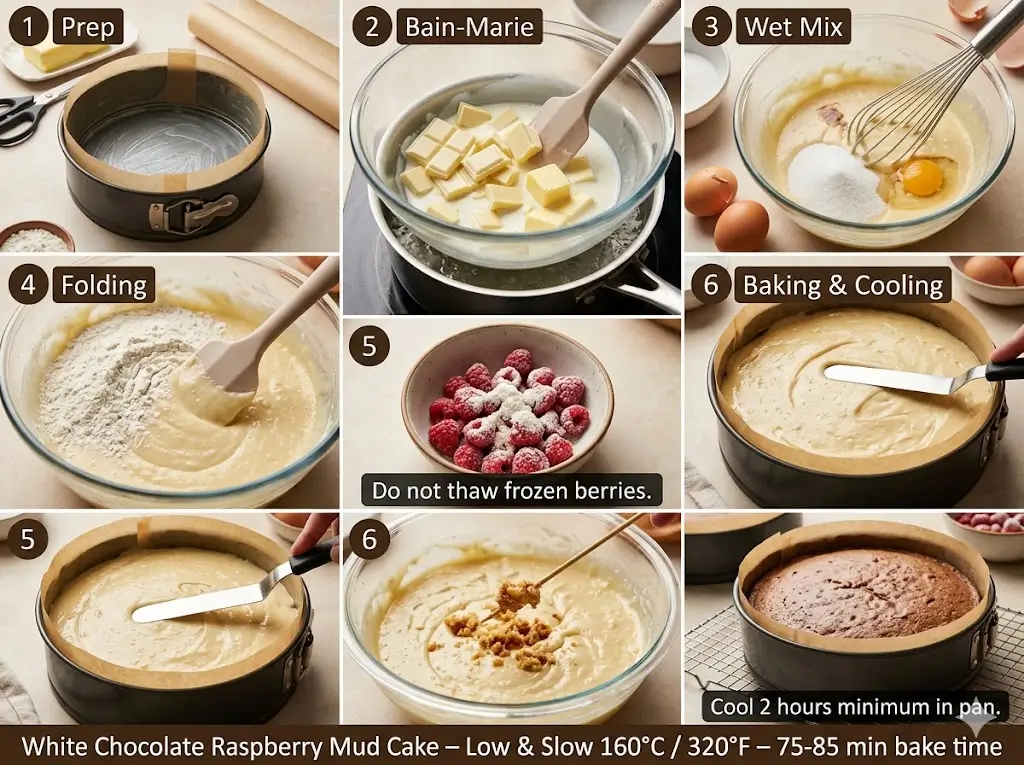
Step 1: Prepping the Pan for a Slow Bake
Preheat your oven to a gentle 320°F (160°C). Mud cakes burn easily due to their high sugar and fat content, so a lower temperature is mandatory. Grease your 8-inch springform pan lightly with butter, then line the base and the sides with parchment paper. Extending the side paper an inch above the rim protects the edges from over-browning.
Step 2: The Bain-Marie Method for White Chocolate
Create a double boiler by bringing an inch of water to a gentle simmer in a saucepan. Place a heatproof bowl on top, ensuring the bottom does not touch the water. Add the chopped butter, white chocolate, and milk. Stir continuously with a silicone spatula until completely melted, glossy, and smooth. Remove from the heat and let it cool for 10 minutes. If the mixture is too hot, it will scramble the eggs in the next step!
Step 3: Whisking the Sugars and Wet Ingredients
Once the chocolate mixture has slightly cooled, vigorously whisk in the caster sugar and vanilla extract until the sugar begins to dissolve. Add the room-temperature eggs one at a time, whisking briskly after each addition until fully incorporated and the batter looks emulsified and slightly thickened.
Step 4: Sifting and Folding the Dry Ingredients
Sift the all-purpose flour, baking powder, and salt directly over the wet mixture. Using a large silicone spatula, gently fold the dry ingredients into the wet. Scrape the bottom of the bowl frequently. Stop folding the moment the last streak of flour vanishes. Overmixing will develop gluten and turn your fudgy cake tough. For a visual breakdown of the perfect folding motion, read our cake baking tips and techniques.
Step 5: Incorporating the Raspberries
In a small separate bowl, toss your fresh or frozen raspberries with one tablespoon of extra flour. This crucial trick creates a friction layer, stopping the heavy berries from sinking straight to the bottom of the cake tin during baking. Gently fold the floured berries into the batter using only three or four broad strokes.
Step 6: The Slow, Even Bake
Pour the heavy batter into your lined springform pan. Smooth the top with an offset spatula. Bake on the middle rack for 75 to 85 minutes. A skewer inserted into the center should come out with sticky, moist crumbs attached—not wet liquid, and definitely not perfectly clean. A clean skewer means the mud cake is overbaked and dry.
Step 7: The Crucial Cooling Process
Remove the cake from the oven. Do not attempt to remove it from the pan! Mud cakes are incredibly fragile when hot. Let it cool completely in the tin on a wire rack for at least 2 hours. For the absolute best fudgy texture, wrap the cooled tin in plastic wrap and refrigerate overnight before slicing.
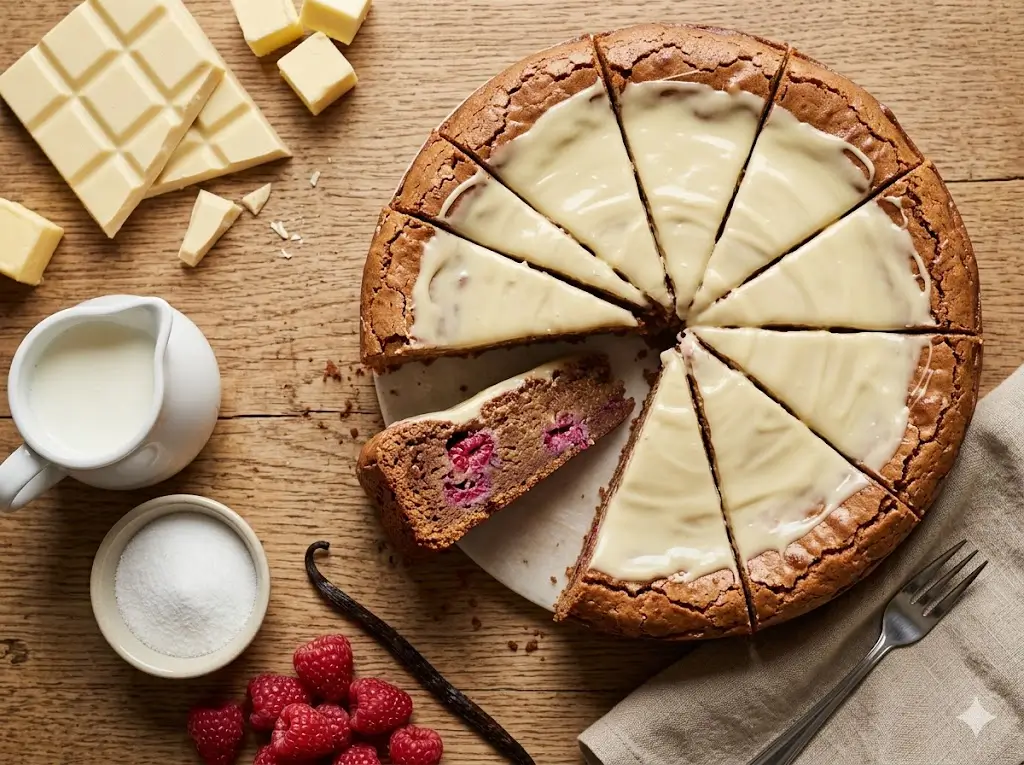
Step 8: Glazing with White Chocolate Ganache (Optional)
To elevate the presentation, heat 1/2 cup of heavy cream until simmering, then pour it over 1 cup of finely chopped white chocolate. Let it sit for 2 minutes, whisk until smooth, and pour it over the chilled cake. Garnish with freeze-dried raspberry dust and fresh berries. For more show-stopping finishes, check out our advanced cake decorating guide.
Nutritional Information
Being mindful of nutritional intake helps you enjoy your desserts with balance. Based on a standard yield of 12 slices, here are the data-driven nutritional insights per serving:
- Calories: 410 kcal
- Carbohydrates: 48g
- Protein: 5g
- Fat: 23g
- Saturated Fat: 14g
- Cholesterol: 70mg
- Sodium: 210mg
- Fiber: 2g (Thanks to the raspberries!)
- Sugar: 34g
Note: The high fat content is derived from the cocoa butter and standard butter, which is exactly what gives a mud cake its signature density. The raspberries provide trace amounts of vitamin C and antioxidants.
Healthier Alternatives for the Recipe
If you need to adapt this recipe for specific dietary needs while maintaining its structural integrity, consider these smart modifications:
- Reduced Sugar Approach: You can reduce the caster sugar to 1 cup (200g) without severely impacting the structure, as the white chocolate provides significant sweetness.
- Gluten-Free Modification: Swap the all-purpose flour for a high-quality 1:1 gluten-free baking blend that contains xanthan gum. Mud cakes adapt brilliantly to gluten-free flour because they don’t rely heavily on gluten for their dense structure.
- Dairy-Free Swaps: Use a vegan white chocolate alternative, swap the butter for a plant-based baking block, and use almond milk or oat milk in place of the full-fat dairy milk.
Serving Suggestions
A cake this rich deserves a presentation that highlights its intricate flavor profile while offering a palate-cleansing contrast.
- The Tart Contrast: Serve a dense slice alongside a vibrant, homemade raspberry coulis (pureed and strained raspberries with a touch of lemon juice). The extra hit of acid perfectly balances the sweet white chocolate.
- Whipped Mascarpone: Instead of heavy buttercream, serve with a dollop of unsweetened whipped cream or lightly whipped mascarpone cheese.
- Elegant Tea Pairing: Pair this dessert with a slightly astringent green tea or a floral Earl Grey. The tannins in the tea cleanse the palate between rich bites.
If you are looking for easy ways to make your slices look professional, browse our cake decoration for beginners post.
Common Mistakes to Avoid
Even seasoned bakers can run into pitfalls when tackling mud cakes. Here are the most typical mistakes and data-backed insights on how to avoid them:
- Seizing the White Chocolate: White chocolate is notoriously sensitive to heat. If your double boiler gets too hot, or if a single drop of water splashes into the bowl, the chocolate will instantly turn grainy and hard. Always melt low and slow.
- Sinking Raspberries: Forgetting to toss the raspberries in flour is the number one reason all the fruit ends up at the bottom of the pan. The flour acts as a physical barrier against the heavy batter.
- Overbaking: Expecting a mud cake to test clean like a sponge cake is a fatal error. If the skewer is completely clean, the cake will be dry. You want sticky, fudgy crumbs.
If you frequently encounter issues like sinking centers or dense streaks, dive into our troubleshooting manual: common cake problems and how to fix them.
Storing Tips for the Recipe
Mud cakes have an incredible shelf life thanks to their high fat and sugar content, making them the ultimate make-ahead dessert!
- Room Temperature: Store in an airtight container in a cool, dark place for up to 4 days. The cake will actually become fudgier on day two!
- Refrigeration: For longer storage, keep it in the fridge for up to a week. Always let refrigerated mud cake sit at room temperature for 1 to 2 hours before eating, as cold cocoa butter becomes very firm.
- Freezing: Wrap the un-iced cake tightly in a layer of plastic wrap, followed by a layer of aluminum foil. Freeze for up to 3 months. Thaw completely at room temperature overnight.
Conclusion
This incredibly rich Raspberry White Chocolate Mud Cake masterfully blends sweet, creamy chocolate with the vibrant tartness of fresh berries. By following these precise baking steps, you guarantee a spectacularly moist dessert. Try this recipe today, share your feedback in our blog comments, and subscribe for more delicious updates!
FAQs
Can I use frozen raspberries instead of fresh ones?
Absolutely. Frozen raspberries often work even better because they hold their shape during the folding process. However, do not thaw them before adding them to the batter. Tossing them in flour while still frozen ensures their juices don’t turn the batter pink or make the cake soggy.
What is the difference between a mud cake and a regular sponge cake?
A mud cake has a much higher ratio of fat (butter and chocolate) and liquid to flour compared to a standard sponge. This prevents the cake from rising significantly and creating large air pockets, resulting in a tight, dense, and “fudgy” crumb that resembles a brownie more than a traditional birthday cake.
Why did my white chocolate turn lumpy when I tried to melt it?
White chocolate contains a high amount of milk solids and cocoa butter, making it extremely sensitive to heat. If the water beneath your double boiler is boiling too vigorously, the chocolate will overheat and “seize,” becoming lumpy and grainy. Always melt it over barely simmering water, and remove it from the heat before it is 100% melted—let residual heat do the rest of the work.
Can I make this cake a few days in advance for an event?
Yes, in fact, it is highly recommended! Mud cakes improve with age. The fats and sugars meld together, and the crumb becomes even tighter and more moist after sitting for 24 to 48 hours. Bake it, let it cool, wrap it tightly in plastic wrap, and leave it on the counter for up to two days before your event.
Raspberry White Chocolate Mud Cake: 7 Best Baking Tips
Ingredients
Equipment
Method
Step 1: Prepping the Pan for a Slow Bake
Preheat your oven to a gentle 320°F (160°C). Mud cakes burn easily due to their high sugar and fat content, so a lower temperature is mandatory. Grease your 8-inch springform pan lightly with butter, then line the base and the sides with parchment paper. Extending the side paper an inch above the rim protects the edges from over-browning.Step 2: The Bain-Marie Method for White Chocolate
Create a double boiler by bringing an inch of water to a gentle simmer in a saucepan. Place a heatproof bowl on top, ensuring the bottom does not touch the water. Add the chopped butter, white chocolate, and milk. Stir continuously with a silicone spatula until completely melted, glossy, and smooth. Remove from the heat and let it cool for 10 minutes. If the mixture is too hot, it will scramble the eggs in the next step!Step 3: Whisking the Sugars and Wet Ingredients
Once the chocolate mixture has slightly cooled, vigorously whisk in the caster sugar and vanilla extract until the sugar begins to dissolve. Add the room-temperature eggs one at a time, whisking briskly after each addition until fully incorporated and the batter looks emulsified and slightly thickened.Step 4: Sifting and Folding the Dry Ingredients
Sift the all-purpose flour, baking powder, and salt directly over the wet mixture. Using a large silicone spatula, gently fold the dry ingredients into the wet. Scrape the bottom of the bowl frequently. Stop folding the moment the last streak of flour vanishes. Overmixing will develop gluten and turn your fudgy cake tough. For a visual breakdown of the perfect folding motion, read our cake baking tips and techniques.Step 5: Incorporating the Raspberries
In a small separate bowl, toss your fresh or frozen raspberries with one tablespoon of extra flour. This crucial trick creates a friction layer, stopping the heavy berries from sinking straight to the bottom of the cake tin during baking. Gently fold the floured berries into the batter using only three or four broad strokes.Step 6: The Slow, Even Bake
Pour the heavy batter into your lined springform pan. Smooth the top with an offset spatula. Bake on the middle rack for 75 to 85 minutes. A skewer inserted into the center should come out with sticky, moist crumbs attached—not wet liquid, and definitely not perfectly clean. A clean skewer means the mud cake is overbaked and dry.Step 7: The Crucial Cooling Process
Remove the cake from the oven. Do not attempt to remove it from the pan! Mud cakes are incredibly fragile when hot. Let it cool completely in the tin on a wire rack for at least 2 hours. For the absolute best fudgy texture, wrap the cooled tin in plastic wrap and refrigerate overnight before slicing.Step 8: Glazing with White Chocolate Ganache (Optional)
To elevate the presentation, heat 1/2 cup of heavy cream until simmering, then pour it over 1 cup of finely chopped white chocolate. Let it sit for 2 minutes, whisk until smooth, and pour it over the chilled cake. Garnish with freeze-dried raspberry dust and fresh berries. For more show-stopping finishes, check out our advanced cake decorating guide.